Back to menu
Creating hard disk images
If you want to create yourself a new hard
disk image, then you must do that in 4 steps
:
- add IDE or SCSI controllers to a machine
- create an empty hard disk image
- format this new hard disk image
- transfer files to the hard disk image
To run hard disk images, see this page.
SCSI hard disk images are not compatible with
the Sunrise IDE hard disk images.
| First step :
add IDE or SCSI controllers to a
machine |
- click on
File / Cartridge Slot 1 (or Slot 2) / Insert
Special / IDE
or File / Cartridge Slot 1 (or
Slot 2) / Insert Special / SCSI
- select one of the 3 available IDE
controllers : Sunrise / Beer / GIDE
or one of the 3 available
SCSI controllers : Mega-SCSI / Wave-SCSI /
Gouda SCSI
You need also to select the SRAM size for
Mega-SCSI or Wave-SCSI.
For more infos about the 3 IDE systems and
the 3 SCSI systems, see this page.
| Second step
: create an empty hard disk image
|
- go to File / Hard Disk
As you have added an IDE or SCSI controller,
the menu can now be used and is a little
different for each IDE or SCSI type.
- go to the Primary Controller or the only
one available controller
You access to this sub-menu :
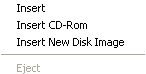
- click on Insert New Disk Image
- select the size of your new hard disk image
: 6 different sizes are directly available (5
MB, 10 MB, 20 MB, 50 MB, 100 MB, 200 MB), but
you can also enter the hard disk size of your
choice with 3MB as minimum size
- type a new name in the filename field and
click on the button "Open"
| Third step :
format the new hard disk image
|
Sunrise IDE
- insert ideutils.dsk in the first floppy
drive (now recognized as B:)
(other option : create a MSX-DOS 2 formatted
dsk file with the following files : MSXDOS2.SYS
- COMMAND2.COM - IDEFDISK.COM - IDEFLOAD.COM
and insert it in the first floppy drive)
- start the emulator
- on the commandline, run the command
IDEFDISK (or other HD formatting application)
- in IdeFdisk, you can set up partitions as
you wish
A quick setup is:
* [A]utogenerate partition table (Press space
when done)
* [W]rite partition table to medium (Press
space when done)
* [I]nitialize all ENABLED partitions (Press
space when done)
* [Q]uit
- on the commandline, copy MSXDOS2.SYS and
COMMAND2.COM from the floppy (B:) to the hard
disk (A:)
- eject the floppy and restart the emulator
Beer IDE
- create a dsk file with all the BEERFDSK
files
- insert this disk in the first floppy drive
- start the emulator
- when you are in MSX-BASIC, type RUN"BEERFDSK.BAS"
and press on RETURN
GIDE
- write and use a specific tool to make the
partition
MEGA-SCSI and WAVE-SCSI
- insert mginst.dsk in the first
floppy drive (now recognized as B: - A: is
reserved for the SRAM)
- on the commandline, type
INST1 or INST2 to install MSX-DOS1 or 2 on
the SRAM and initialize the SRAM
- reset the MSX
- to assign drive letter to the hard drive,
use the ESET tool (it will also change the
drive letter for your floppies)
- reset the MSX
- to format the hard disk image, use SFORM-1
under MSX-DOS 1 or SFORM-2 under MSX-DOS 2
- don't forget to copy MSXDOS 2 on the hard
disk !
GOUDA SCSI
- insert novaxis.dsk in the first
floppy drive (now recognized as B:)
- press on GRAPH
when booting the MSX to ignore the hard disk
- go to the hddutils
subdirectory and start the NFDISK tool
- press on the spacebar to access to
the partition menu
- create only one partition
if you don't have changed the default
settings of the hard disk (*)
- write this partition and
quit the NFDISK tool
- after the reset, copy MSXDOS2.SYS and
COMMAND2.COM from the floppy (B:) to the hard
disk (A:) by using the MSX-BASIC
command COPY
(*) the setup menu is accessible by pressing
on the DEL key when booting
| Fourth step
: transfer files to the hard disk
image |
"Normal"
files from disk image
You can use the COPY command of MSX-DOS 2.
"Special" disk images (data in
sectors)
External tools are required.
In the case of Snatcher English/Portuguese,
they are on the disk 0, you need to follow
the procedure described in the text file. If
you use a Sunrise IDE hard disk image, the
manual procedure is recommended.
For other games, you need to find the best
option as some tools work better with some
games. You can find more infos by checking
this thread on the blueMSX forum : http://www.bluemsx.com/blueforum/viewtopic.php?t=1310
Files from PC harddisk
It is recommended to use the Japanese
DiskExplorer with the MSX plugin. Although
conceived for SCSI harddisks images, it works
also with IDE harddisks images. You need to
select the "vmware plain disk"
option when you open the hard disk image.
Japanese DiskExplorer : http://hp.vector.co.jp/authors/VA013937/editdisk/index_e.html
MSX plugin : http://genora.s55.xrea.com/msx/plugin.html
Back to menu